Create a Flow
Flows are used in SharePoint to streamline business processes so they are consistent and reliable. An example might be a series of stakeholders that need to approve a sales target before it is given to a sales person. You can start creating flows right from within a Custom Lists. In fact, anyone with permissions to add and edit items on the list will have the option to create a flow.
To create a flow, follow these steps:
|
|
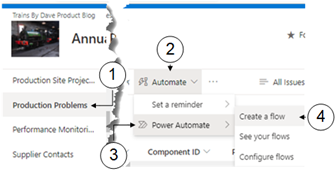
Navigate to your custom list |
|
|
Click on Automate in the Task Bar |
|
|
Select Power Automate from the dropdown list. |
|
|
From the submenu click Create a Flow. |
|
|
The Create a Flow panel will open on the right of the browser window. |
|
|
From the list, select a template of the type of Flow you wish to create. |
|
|
For a greater range of templates select Show More below the template list. |
|
|
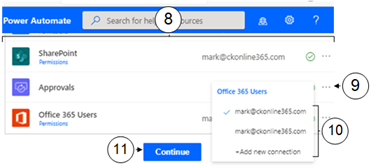
A screen appears listing the apps involved in the flow and the accounts used. |
|
|
To change the app access account click on the ellipsis (...) next to the credentials, |
|
Select an alternative account from the dropdown list. |
|
|
Click Continue. |
|
|
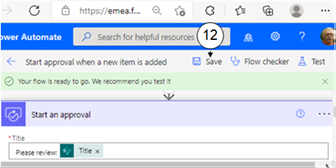
Edit the flow as required. Once you have completed the flow, click Save at the top of the window. |