Add a Document Library Web Part
The Document Library web part allows you to display a document library and customize it with your own title, view, and even size parameters. Users with appropriate permissions can view or edit files directly from the web part, or can even upload documents directly to the library.
In the Document Library Web Part you have the ability to select a document or list item and then click the information icon to reveal the metadata. Other options include pinning a document to the top of the library, download, delete and rename files.
Additionally,you can display a specific folder in the library by entering the folder name in the Document Library configuration pane (see Step 8):
You can find help with creating a new page in the Add a Page to a Team Site topic
|
|
Navigate to the page you wish to modify |
|
|
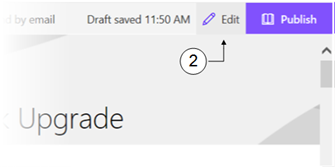
Click on Edit. |
|
|
Click on the |
|
|
Select Document Library from the dropdown list of web parts. |
|
|
Select the document library you want to add to the page. |
|
|
Click Edit web part button on the left side to configure the web part |
|
|
The Document Library window appears to the right of the screen. |
|
|
Select any available library view and folder. |
|
|
Select the required size of the web part. |
|
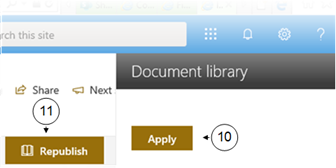
Click Apply. |
|
|
Select Publish (or Republish) at the top right of your page to make the changes visible. |


 sign below the title box. This prompt will also appear between any existing web parts.